Diskless mini PC walkthrough
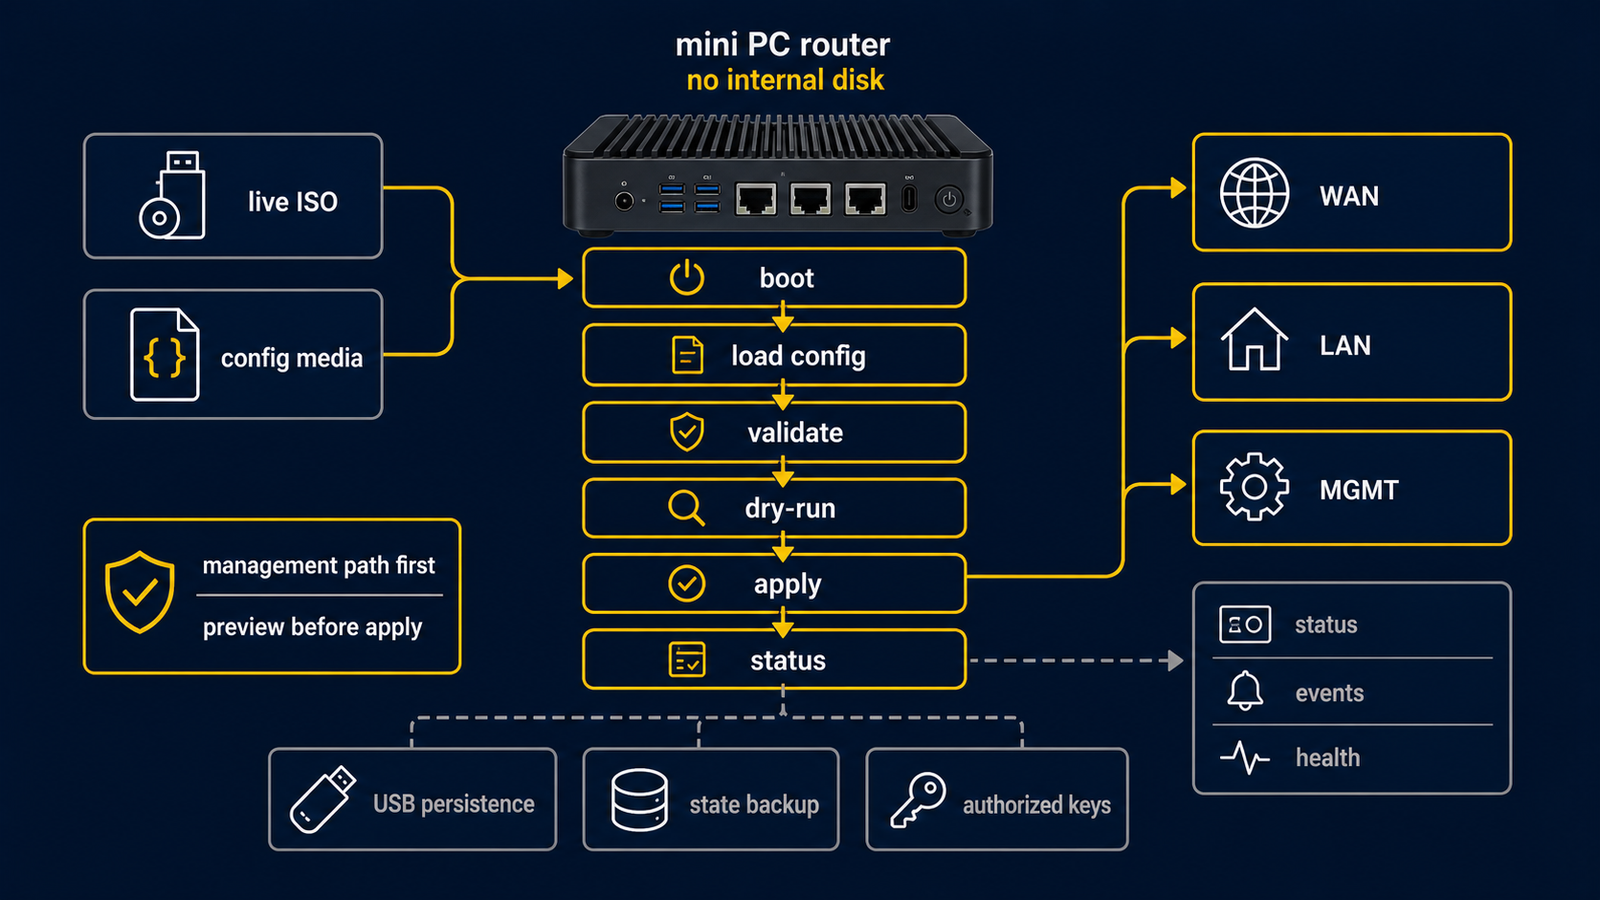
This tutorial turns a small x86 mini PC into a router without installing an OS to its internal disk. The router boots the routerd live ISO, stores configuration on USB, buffers logs in RAM, and flushes a compact archive to USB once per day.

What you need
- A mini PC with at least two network interfaces.
- A USB stick for routerd persistence.
- The latest
routerd-live.iso. - Console access. On Proxmox VE,
qm terminalworks through the serial console. - A WAN network that can provide DHCPv4, or a static WAN address.
- A LAN switch or isolated test bridge.
1. Prepare the USB stick
Create one partition and format it with a filesystem the live ISO can mount.
ext4 is the best default. vfat and exfat also work for simple removable
media. Label it ROUTERD so the ISO can find it automatically.
FAT32 is reported by blkid as vfat; it is supported, but ext4 is better
for a USB stick that is dedicated to routerd.
Example from a Linux workstation:
sudo mkfs.ext4 -L ROUTERD /dev/sdX1
Replace /dev/sdX1 with the actual USB partition. Do not format the wrong
device.
2. Boot the live ISO
Download the fixed latest URL:
curl -LO https://github.com/imksoo/routerd/releases/latest/download/routerd-live.iso
curl -LO https://github.com/imksoo/routerd/releases/latest/download/routerd-live.iso.sha256
sha256sum -c routerd-live.iso.sha256
Boot the mini PC from the ISO. The same image works on a video console and a serial console.
For Proxmox VE:
qm create 200 \
  --name routerd-live-demo \
  --memory 1536 \
  --cores 2 \
  --ostype l26 \
  --serial0 socket \
  --vga std \
  --boot order=ide2 \
  --ide2 local:iso/routerd-live.iso,media=cdrom \
  --net0 virtio,bridge=vmbr0 \
  --net1 virtio,bridge=vmbr490
qm start 200
qm terminal 200
Use an isolated LAN bridge for early DHCP and RA testing.

The ISO enables both the video console and the serial console.
On Proxmox VE, the interactive wizard is normally easier to read through
qm terminal; the VGA screenshots are useful for boot evidence, while the
serial transcript below shows the actual inputs and results.

3. Run the wizard
Log in as root. The live ISO starts the setup wizard.

The serial console should show the live ISO message and the wizard prompt:
Welcome to Ubuntu 26.04 LTS
Kernel 6.18.22-generic on x86_64 (/dev/ttyS0)

localhost login: root
routerd live v20260510.1811

Run the setup wizard:
  /usr/share/routerd/install.sh configure

Starting routerd setup wizard. Press Ctrl+C to skip.
routerd initial configuration wizard

Available interfaces:
  - lo
  - eth0
  - eth1
The wizard asks for:
- router name
- WAN interface
- WAN IPv4 mode
- LAN interface
- LAN address
- DHCPv4, DNS, NTP, RA, firewall, and NAT44 choices
- management placement
- USB persistence

This is the same run captured from the serial console:
Router name [routerd-router]: routerd-live-router-test
WAN interface: eth0
WAN IPv4 mode (dhcp/static) [dhcp]: dhcp
Default DNS upstreams when DHCP DNS is unavailable [1.1.1.1]: 1.1.1.1
LAN interface: eth1
LAN address/CIDR [192.168.10.1/24]: 192.168.99.1/24
LAN client CIDR [192.168.99.0/24]: 192.168.99.0/24
Enable DHCPv4 server? (yes/no) [yes]: yes
DHCPv4 pool start [192.168.99.100]:
DHCPv4 pool end [192.168.99.200]:
Enable DHCPv6 stateless service? (yes/no) [no]: no
Enable IPv6 RA? (yes/no) [no]: no
Enable DNS resolver? (yes/no) [yes]: yes
Enable NTP server? (yes/no) [yes]: yes
Enable 3-role firewall? (yes/no) [yes]: yes
Enable NAT44 from LAN to WAN? (yes/no) [yes]: yes
Management placement (separate/lan) [lan]: lan
Save config to USB for diskless persistence? (yes/no) [no]: no
generated candidate config: /usr/local/etc/routerd/router.yaml.configure
Install this config as router.yaml? (yes/no) [no]: yes
When asked about USB persistence, choose yes and select the USB partition.
If the partition is labeled ROUTERD, it should be listed automatically.
Enable the daily USB flush job unless you are only testing. The default log
buffer is 100 MiB under /run/routerd/logs.
The live helper detects ext4, vfat, and exfat with blkid. It mounts USB
persistence with async,noatime by default to reduce writes. If you need
synchronous writes for a specific test, add routerd.usb_mount=sync to the
kernel command line.
The selected USB partition is mounted at /media/routerd-usb. The saved
configuration path is /media/routerd-usb/routerd/router.yaml. It is not
/mnt/routerd/router.yaml.
4. Confirm the first apply
After confirmation, the wizard writes:
/usr/local/etc/routerd/router.yaml
It then runs:
routerctl validate -f /usr/local/etc/routerd/router.yaml --replace
routerctl plan -f /usr/local/etc/routerd/router.yaml --replace
routerctl apply -f /usr/local/etc/routerd/router.yaml --replace
Check status:
routerctl status
The phase should become Healthy.
The serial log should contain a status response like this:
{
  "apiVersion": "control.routerd.net/v1alpha1",
  "kind": "Status",
  "status": {
    "phase": "Healthy",
    "generation": 1,
    "resourceCount": 14
  }
}
5. Test a LAN client
Connect a client to the LAN interface or test bridge.
The client should receive:
- an IPv4 address from the configured DHCPv4 pool
- default route through the router
- DNS server pointing at the router
- NTP server pointing at the router, when enabled
Basic checks:
dig @192.168.10.1 www.google.com A +short
curl -4 https://www.google.com/generate_204
Adjust the address if you chose a different LAN prefix.
The PVE validation used a temporary network namespace connected to the isolated LAN bridge. It received a lease from routerd and reached the Internet through routerd NAT44:
inet 192.168.99.186/24
default via 192.168.99.1 dev veth-rtest

dig @192.168.99.1 www.google.com A +short
142.251.156.119
142.251.150.119
142.251.151.119
...

curl -4 https://www.google.com/generate_204
http_code=204 remote_ip=142.251.156.119 time_total=0.024397

curl http://192.168.99.1:8080/
http_code=200 remote_ip=192.168.99.1 time_total=0.000537
6. Reboot and confirm persistence
Reboot the mini PC with the USB stick still attached.
At boot, the live ISO:
- finds the USB device from the remembered device,
routerd.usb=, or theROUTERDfilesystem label - mounts it at
/media/routerd-usb - restores
/media/routerd-usb/routerd/router.yaml - prepares
/run/routerd/logsas tmpfs - applies the router configuration
- starts the live routerd daemon
Log in and run:
routerctl status
The router should converge without rerunning the wizard.
If no USB config is restored and /usr/local/etc/routerd/router.yaml is still
missing, the root login profile starts the configure wizard.
7. How log persistence works
Logs are written to RAM first:
/run/routerd/logs
The daily flush job copies these artifacts to USB:
- current
router.yaml - routerd state snapshot
- compressed log archive
This avoids constant writes to USB flash. If the tmpfs buffer exceeds the configured limit, older files are removed first.
You can flush manually:
/usr/share/routerd/live-persistence.sh flush
Before physically removing the USB device, flush and unmount it:
/usr/share/routerd/live-persistence.sh flush
/usr/share/routerd/live-persistence.sh umount
If the device is removed without unmounting, routerd keeps running from RAM and prints a warning. New logs remain in tmpfs until the USB device is available again.
Troubleshooting
The wizard does not list the USB stick
Check the partition from the shell:
blkid
lsblk -f
If needed, pass the device explicitly on the kernel command line:
routerd.usb=/dev/sdb1
The router boots into wizard mode again
The ISO did not find a saved config. Mount the USB device and check:
mount /dev/sdX1 /media/routerd-usb
ls -l /media/routerd-usb/routerd/router.yaml
Logs are missing after reboot
Logs are buffered in RAM. They persist only after the daily flush job runs or after a manual flush.
The LAN client has no address
Check that the LAN interface is the one selected in the wizard:
routerctl status --json
ip addr
If you are testing in Proxmox VE, confirm the client and router LAN NIC are on the same isolated bridge.