Install and upgrade
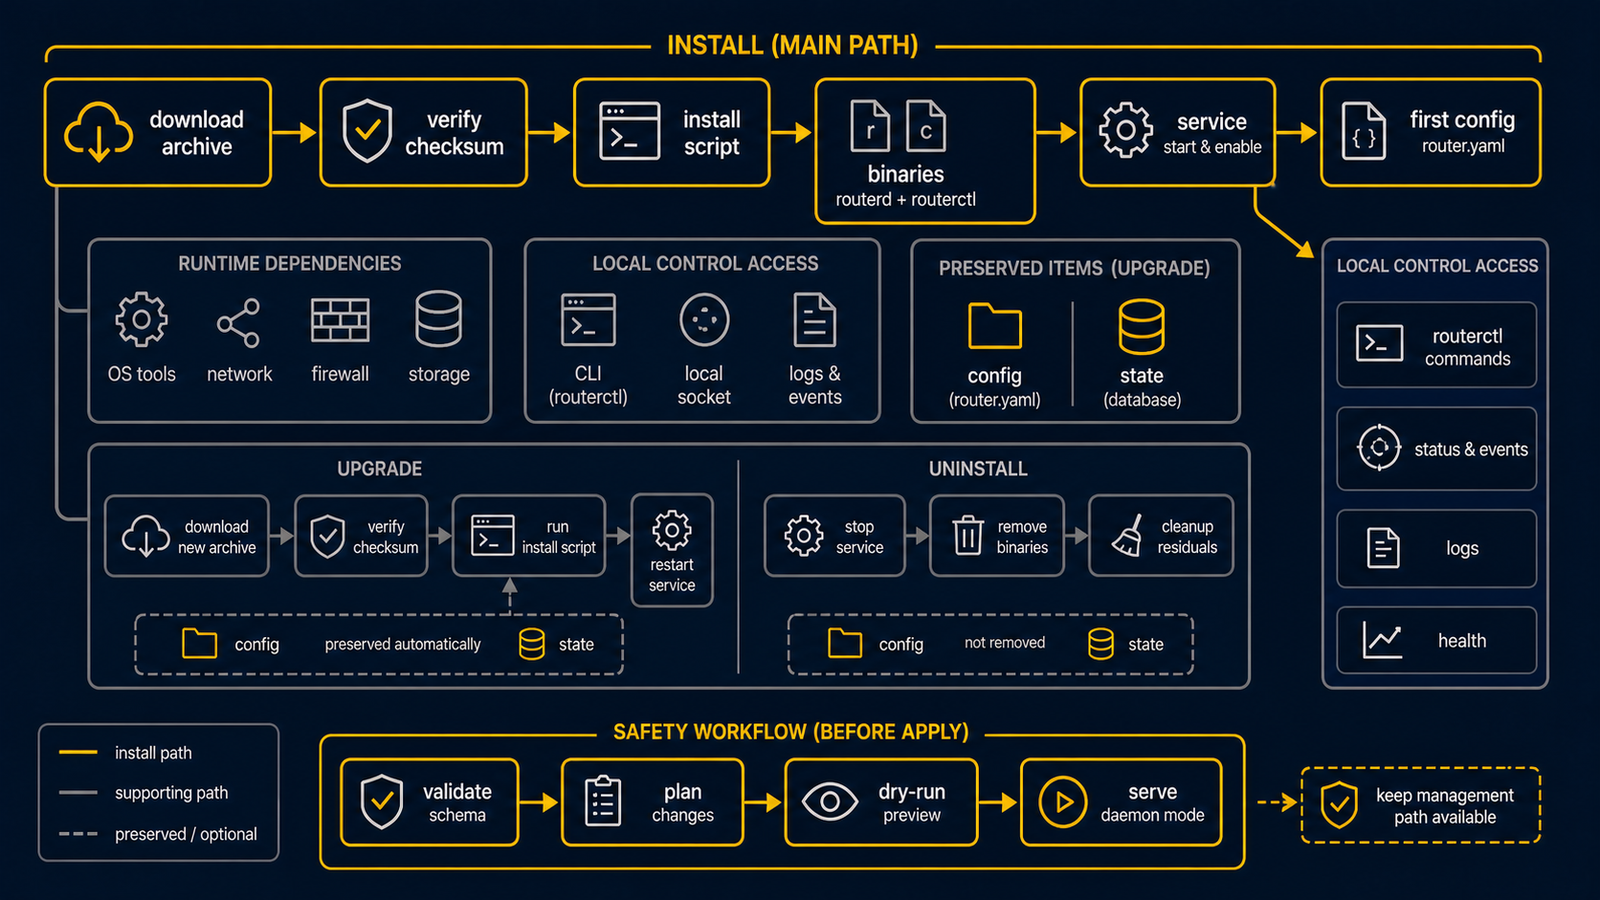
Use the release archive when you install routerd on a router host. The archive contains the binaries, service template, sample configuration, and the installer scripts. You do not need a Go toolchain or the Makefile on the router host.
Quick install
Download the archive for your OS and architecture from the GitHub Releases page.
Linux amd64:
curl -LO https://github.com/imksoo/routerd/releases/latest/download/routerd-linux-amd64.tar.gz
curl -LO https://github.com/imksoo/routerd/releases/latest/download/routerd-linux-amd64.tar.gz.sha256
sha256sum -c routerd-linux-amd64.tar.gz.sha256
tar -xzf routerd-linux-amd64.tar.gz
sudo ./install.sh
For Linux arm64, use the linux-arm64 archive.
FreeBSD amd64:
fetch https://github.com/imksoo/routerd/releases/latest/download/routerd-freebsd-amd64.tar.gz
fetch https://github.com/imksoo/routerd/releases/latest/download/routerd-freebsd-amd64.tar.gz.sha256
cat routerd-freebsd-amd64.tar.gz.sha256
sha256 routerd-freebsd-amd64.tar.gz
tar -xzf routerd-freebsd-amd64.tar.gz
sudo ./install.sh
For FreeBSD arm64, use the freebsd-arm64 archive.
The latest release also includes versioned archives such as
routerd-vYYYYMMDD.HHmm-linux-amd64.tar.gz.
Use those when you need to pin a specific release.
Linux archives are built with CGO_ENABLED=0 and contain statically linked
routerd binaries. They do not require the router host to have the same glibc
version as the build machine. Runtime tools such as dnsmasq, nft, ip,
conntrack, and tcpdump are still installed or checked by install.sh.
Hosts that require native nDPI application classification should also download
the matching routerd-ndpi-agent-libndpi-linux-amd64.tar.gz archive and install
it explicitly with the normal archive:
curl -LO https://github.com/imksoo/routerd/releases/latest/download/routerd-ndpi-agent-libndpi-linux-amd64.tar.gz
curl -LO https://github.com/imksoo/routerd/releases/latest/download/routerd-ndpi-agent-libndpi-linux-amd64.tar.gz.sha256
sha256sum -c routerd-ndpi-agent-libndpi-linux-amd64.tar.gz.sha256
sudo ./install.sh --with-ndpi \
  --with-ndpi-archive ./routerd-ndpi-agent-libndpi-linux-amd64.tar.gz
--with-ndpi fails if the final installed routerd-ndpi-agent does not report
libndpiLoaded: true, so the static fallback agent cannot silently satisfy a
native nDPI requirement.
install.sh detects whether this is a fresh install or an upgrade.
It installs the binaries under /usr/local/sbin, installs the service template,
and writes /usr/local/etc/routerd/router.yaml.sample.
It never overwrites an existing /usr/local/etc/routerd/router.yaml.
On systemd hosts, the installer creates the routerd group for local socket
access. Add an operator with sudo usermod -aG routerd <user> to allow
routerctl status and other local control socket operations without sudo.
Upgrading a router that runs BGP
routerd-bgp is a long-lived daemon that holds the BGP sessions. Restarting it
drops those sessions; peers keep the old paths until their hold timers expire,
so ECMP shrinks during that window. On systemd hosts, install.sh now refreshes
active routerd helper services that still run a deleted pre-upgrade binary,
including routerd-bgp and routerd-dns-resolver instances. This keeps the
post-upgrade host from carrying stale executables under /proc/*/exe.
Expect BGP to reconverge after the installer restarts the helper. Do not restart
routerd-bgp again while it is reconverging — a rapid second restart makes
peers hold stale paths and collapses ECMP. Graceful restart protects a single
restart only. Wait for reconvergence before judging (allow up to ~3–6 minutes;
the BGP hold timer and graceful-restart stale-path timer drive this). Pass
conditions: every peer back to Established, full-width ECMP for the affected
prefixes, and end-to-end reachability (for example an HTTP 200 through the ECMP
path).
During this window it is normal for one peer to stay IDLE and repeatedly log
Closed an accepted connection: that peer is still holding the previous session
and rejecting the new one until its hold timer expires. Do not restart again —
wait it out; the peer establishes and ECMP returns on its own.
Local control socket access for non-root operators
The read-only status socket (/run/routerd/routerd-status.sock) lets non-root
operators run routerctl status without sudo. When a routerd group exists,
routerd hands that socket to it (root:routerd, mode 0o660); connecting to a
unix socket needs write access, so members get read+write. routerd sets this
group ownership itself when it creates the socket, so it does not depend on
the service unit's Group= setting. If no routerd group exists, the status
socket falls back to world-accessible (0o666) so nobody is locked out.
The read-write control socket (/run/routerd/routerd.sock, used by
routerctl apply/delete) stays root-owned 0o660: mutating the router
still requires root/sudo.
To give an operator sudo-less routerctl status:
sudo usermod -aG routerd <user>(the installer already created the group).- Group membership only applies to new login sessions. Re-login (or open a
new SSH session / run
newgrp routerd) before it takes effect. To use the group in the current shell without a full re-login, wrap the command:sg routerd -c 'routerctl status'.
Verify with ls -l /run/routerd/routerd-status.sock (expect
srw-rw---- root routerd) and id <user> (expect routerd in the group list).
A user who is not in the group is denied by design; that is the intended
hardening, not a regression. No service-unit change is required.
Try the live ISO
The release page also publishes a bootable Ubuntu-based live ISO:
curl -LO https://github.com/imksoo/routerd/releases/latest/download/routerd-live.iso
curl -LO https://github.com/imksoo/routerd/releases/latest/download/routerd-live.iso.sha256
sha256sum -c routerd-live.iso.sha256
Attach the ISO to a Proxmox VE test VM and boot it.
The console prints routerd setup instructions and starts the same
install.sh configure wizard after root login.
Use the ISO for demos and short trials.
For a persistent router, install routerd onto disk with the release archive.
The live ISO enables both the video console and a serial console.
On virtual machines (for example KVM/Proxmox), the live boot flow also attempts to
start qemu-guest-agent automatically when the service is available.
sshd is packaged for operator access in virtualized environments, but Live ISO keeps it stopped by default.
On Proxmox VE, add a serial socket and connect with qm terminal:
qm create 200 \
  --name routerd-live-demo \
  --memory 1536 \
  --cores 2 \
  --ostype l26 \
  --serial0 socket \
  --vga serial0 \
  --boot order=ide2 \
  --ide2 local:iso/routerd-live.iso,media=cdrom \
  --net0 virtio,bridge=vmbr0 \
  --net1 virtio,bridge=vmbr490
qm start 200
qm terminal 200
Use an isolated LAN bridge for net1 when you test DHCP or RA.
The serial console runs at 115200 8N1 and uses plain text prompts, so the same
wizard works from qm terminal, a framebuffer console, or a minimal terminal.
The live ISO can run in two modes:
- Ephemeral demo mode: no USB storage is selected. Configuration and logs live in RAM and disappear at reboot.
- Persistent router mode: select a USB partition in the wizard. The wizard
saves
router.yamlto the USB device. On the next boot, the ISO mounts the USB device, restores the config, and applies it automatically.
For persistent mode, label the USB partition ROUTERD or pass
routerd.usb=/dev/sdX1 on the kernel command line when multiple removable
devices are present. The helper detects ext4, vfat, and exfat with
blkid and mounts them with async,noatime by default. Pass
routerd.usb_mount=sync only when you explicitly want synchronous writes.
Logs are buffered under /run/routerd/logs on tmpfs. The wizard can enable a
daily flush job that copies the config, state snapshot, and compressed log
archive to the USB device. The default tmpfs log limit is 100 MiB. Older log
files are removed when the buffer exceeds that limit.
For safe USB removal, run:
/usr/share/routerd/live-persistence.sh flush
/usr/share/routerd/live-persistence.sh umount
See Operations → USB persistence for the full layout and mount options.
Versioned ISO files are also published, for example
routerd-live-vYYYYMMDD.HHmm.iso.
Runtime dependencies
By default, install.sh installs known OS packages before copying routerd.
Use --list-deps to inspect the package list:
./install.sh --list-deps
Use --no-install-deps when dependencies are already managed by another tool:
sudo ./install.sh --no-install-deps
Use --deps-only when you only want to install dependencies:
sudo ./install.sh --deps-only
Tailscale is optional.
Add it to the package list with --with-tailscale:
sudo ./install.sh --with-tailscale
Debian and Ubuntu
The installer uses apt-get and installs:
ca-certificates curl dnsmasq-base nftables wireguard-tools chrony bind9-dnsutils tcpdump cron jq ppp pppoe conntrack iproute2 iputils-ping iputils-tracepath net-tools kmod radvd strongswan-swanctl iptables keepalived openssh-server
Fedora-like systems
The installer uses dnf and installs:
ca-certificates curl dnsmasq nftables wireguard-tools chrony bind-utils tcpdump cronie jq ppp rp-pppoe conntrack-tools iproute iputils traceroute kmod radvd strongswan iptables keepalived openssh-server
Arch-like systems
The installer uses pacman and installs:
ca-certificates curl dnsmasq nftables wireguard-tools chrony bind tcpdump cronie jq ppp rp-pppoe conntrack-tools iproute2 iputils traceroute kmod radvd strongswan iptables keepalived openssh
FreeBSD
The installer uses pkg and installs:
ca_root_nss curl dnsmasq wireguard-tools mpd5 bind-tools tcpdump jq chrony strongswan
FreeBSD pf, ifconfig, route, sysctl, service, sysrc, cron,
netstat, sockstat, ping, and traceroute are base-system tools.
The installer checks for the commands but does not install them as packages.
Upgrade
Extract the new archive and run the same installer:
tar -xzf routerd-linux-amd64.tar.gz
sudo ./install.sh
When /usr/local/sbin/routerd already exists, the installer switches to upgrade
mode.
It prints the old and new routerd --version output.
It replaces binaries and service templates, keeps configuration and state, and
restarts the routerd service if it was already active.
On systemd hosts, it waits for the restarted routerd.service to expose its
status socket, lets routerd-managed unit files settle, and then restarts only
active routerd helper services that still need refresh. A helper needs refresh
when it is still running a deleted pre-upgrade binary or when its unit file was
updated after the helper process started.
When /etc/systemd/system/routerd.service is already managed by routerd
configuration, the installer preserves that unit instead of overwriting it with
the archive template.
Every replaced file is copied to *.backup.YYYYMMDDHHMMSS before replacement.
If the install fails partway through, the script restores files from the
temporary rollback backup.
routerd derives its own routerd.service unit from the router configuration.
When that unit changes, the controller schedules a delayed self-restart through
systemd-run instead of directly restarting itself in the middle of the
controller pass.
When the same router config contains VRRP or ingress service resources, routerd
augments its own unit with the keepalived paths and capabilities needed by the
generated integrations. BGP no longer requires FRR groups or writable FRR
runtime directories because the GoBGP backend runs as the managed
routerd-bgp daemon and is controlled through a local gRPC Unix socket.
Useful options:
sudo ./install.sh --no-restart
sudo ./install.sh --dry-run
sudo ./install.sh --verbose
sudo ./install.sh --no-config-update
Layout
The release installer uses these paths:
| Item | Linux | FreeBSD |
|---|---|---|
| Configuration | /usr/local/etc/routerd/router.yaml | /usr/local/etc/routerd/router.yaml |
| Sample configuration | /usr/local/etc/routerd/router.yaml.sample | /usr/local/etc/routerd/router.yaml.sample |
| Binaries | /usr/local/sbin | /usr/local/sbin |
| Service template | /etc/systemd/system/routerd.service | /usr/local/etc/rc.d/routerd |
| Runtime sockets | /run/routerd | /var/run/routerd |
| Persistent state | /var/lib/routerd | /var/db/routerd |
The installer never removes these state locations:
/usr/local/etc/routerd/router.yaml/var/lib/routerd/var/db/routerd/run/routerd/var/run/routerd/var/log/otelcol
First configuration
For a first trial, run the built-in setup wizard:
sudo ./install.sh configure
The wizard asks for the WAN interface, LAN interface, LAN address, LAN services,
management placement, and optional USB persistence. It writes a candidate file to
/usr/local/etc/routerd/router.yaml.configure, shows a diff when an existing
configuration is present, and installs it as
/usr/local/etc/routerd/router.yaml only after confirmation.
It then runs routerctl validate, routerctl plan, and routerctl apply.
Automation can use environment variables and skip prompts:
sudo ROUTERD_WAN_INTERFACE=ens18 \
  ROUTERD_LAN_INTERFACE=ens19 \
  ROUTERD_LAN_ADDRESS=192.168.10.1/24 \
  ROUTERD_LAN_CIDR=192.168.10.0/24 \
  ROUTERD_MGMT_MODE=lan \
  ROUTERD_ENABLE_USB_PERSISTENCE=no \
  ./install.sh configure --non-interactive --yes
For live ISO USB persistence, set:
sudo ROUTERD_ENABLE_USB_PERSISTENCE=yes \
  ROUTERD_USB_DEVICE=/dev/sdb1 \
  ROUTERD_USB_FLUSH=yes \
  ROUTERD_LOG_TMPFS_LIMIT=100M \
  ./install.sh configure --non-interactive --yes
Use --no-apply when you want only the YAML file.
sudo ./install.sh configure --no-apply
Manual configuration is still available. Copy a sample configuration into place and edit it for your interfaces:
sudo install -d -m 0755 /usr/local/etc/routerd
sudo install -m 0600 /usr/local/etc/routerd/router.yaml.sample /usr/local/etc/routerd/router.yaml
sudo vi /usr/local/etc/routerd/router.yaml
Then validate and review the plan:
routerctl validate -f /usr/local/etc/routerd/router.yaml --replace
routerctl plan -f /usr/local/etc/routerd/router.yaml --replace
Apply only after the management path is safe:
sudo routerctl apply -f /usr/local/etc/routerd/router.yaml --replace
Start the service when the one-shot apply is healthy:
sudo systemctl enable --now routerd.service
On FreeBSD:
sudo sysrc routerd_enable=YES
sudo service routerd start
Uninstall
The release archive also contains uninstall.sh.
The default uninstall removes binaries, service templates, and runtime files.
It keeps configuration and state.
sudo ./uninstall.sh --yes
Purge options are explicit:
sudo ./uninstall.sh --yes --purge-config
sudo ./uninstall.sh --yes --purge-state
sudo ./uninstall.sh --yes --all
Use --dry-run to preview removal.
Developer workflow
The Makefile is for development only. Use it to test, build, generate schemas, validate examples, build the website, and create release archives:
make test
make check-schema
make validate-example
make website-build
make dist ROUTERD_OS=linux GOARCH=amd64 VERSION="$(git describe --tags --abbrev=0)"
Do not use the Makefile as the user-facing install path.
The release archive and install.sh are the supported deployment path.