安装与升级
通过发布归档包将 routerd 安装至路由器主机。 归档包含可执行文件、服务模板、配置示例及安装程序。 路由器主机上不需要 Go 或 Makefile。
快速安装
从 GitHub Releases 获取符合您操作系统与架构的归档包。
Linux amd64:
curl -LO https://github.com/imksoo/routerd/releases/latest/download/routerd-linux-amd64.tar.gz
curl -LO https://github.com/imksoo/routerd/releases/latest/download/routerd-linux-amd64.tar.gz.sha256
sha256sum -c routerd-linux-amd64.tar.gz.sha256
tar -xzf routerd-linux-amd64.tar.gz
sudo ./install.sh
Linux arm64 请使用 linux-arm64 归档包。
FreeBSD amd64:
fetch https://github.com/imksoo/routerd/releases/latest/download/routerd-freebsd-amd64.tar.gz
fetch https://github.com/imksoo/routerd/releases/latest/download/routerd-freebsd-amd64.tar.gz.sha256
cat routerd-freebsd-amd64.tar.gz.sha256
sha256 routerd-freebsd-amd64.tar.gz
tar -xzf routerd-freebsd-amd64.tar.gz
sudo ./install.sh
FreeBSD arm64 请使用 freebsd-arm64 归档包。
最新发布也提供带版本号的归档包,格式如 routerd-vYYYYMMDD.HHmm-linux-amd64.tar.gz。
若需固定于特定版本,请使用带版本号的归档包。
Linux 归档包含以 CGO_ENABLED=0 静态链接的 routerd 二进制文件,
因此不依赖部署目标主机的 glibc 版本。
dnsmasq、nft、ip、conntrack、tcpdump 等运行时工具,
仍由 install.sh 负责安装或确认。
若主机需要以 native nDPI 进行应用识别,请另外获取对应的
routerd-ndpi-agent-libndpi-linux-amd64.tar.gz,并在常规归档包的安装流程中明确应用。
curl -LO https://github.com/imksoo/routerd/releases/latest/download/routerd-ndpi-agent-libndpi-linux-amd64.tar.gz
curl -LO https://github.com/imksoo/routerd/releases/latest/download/routerd-ndpi-agent-libndpi-linux-amd64.tar.gz.sha256
sha256sum -c routerd-ndpi-agent-libndpi-linux-amd64.tar.gz.sha256
sudo ./install.sh --with-ndpi \
  --with-ndpi-archive ./routerd-ndpi-agent-libndpi-linux-amd64.tar.gz
加上 --with-ndpi 时,安装后的 routerd-ndpi-agent 若未返回 libndpiLoaded: true,
安装程序即会失败。此设计确保静态回退代理不会在未实际支持 native nDPI 的情况下静默通过。
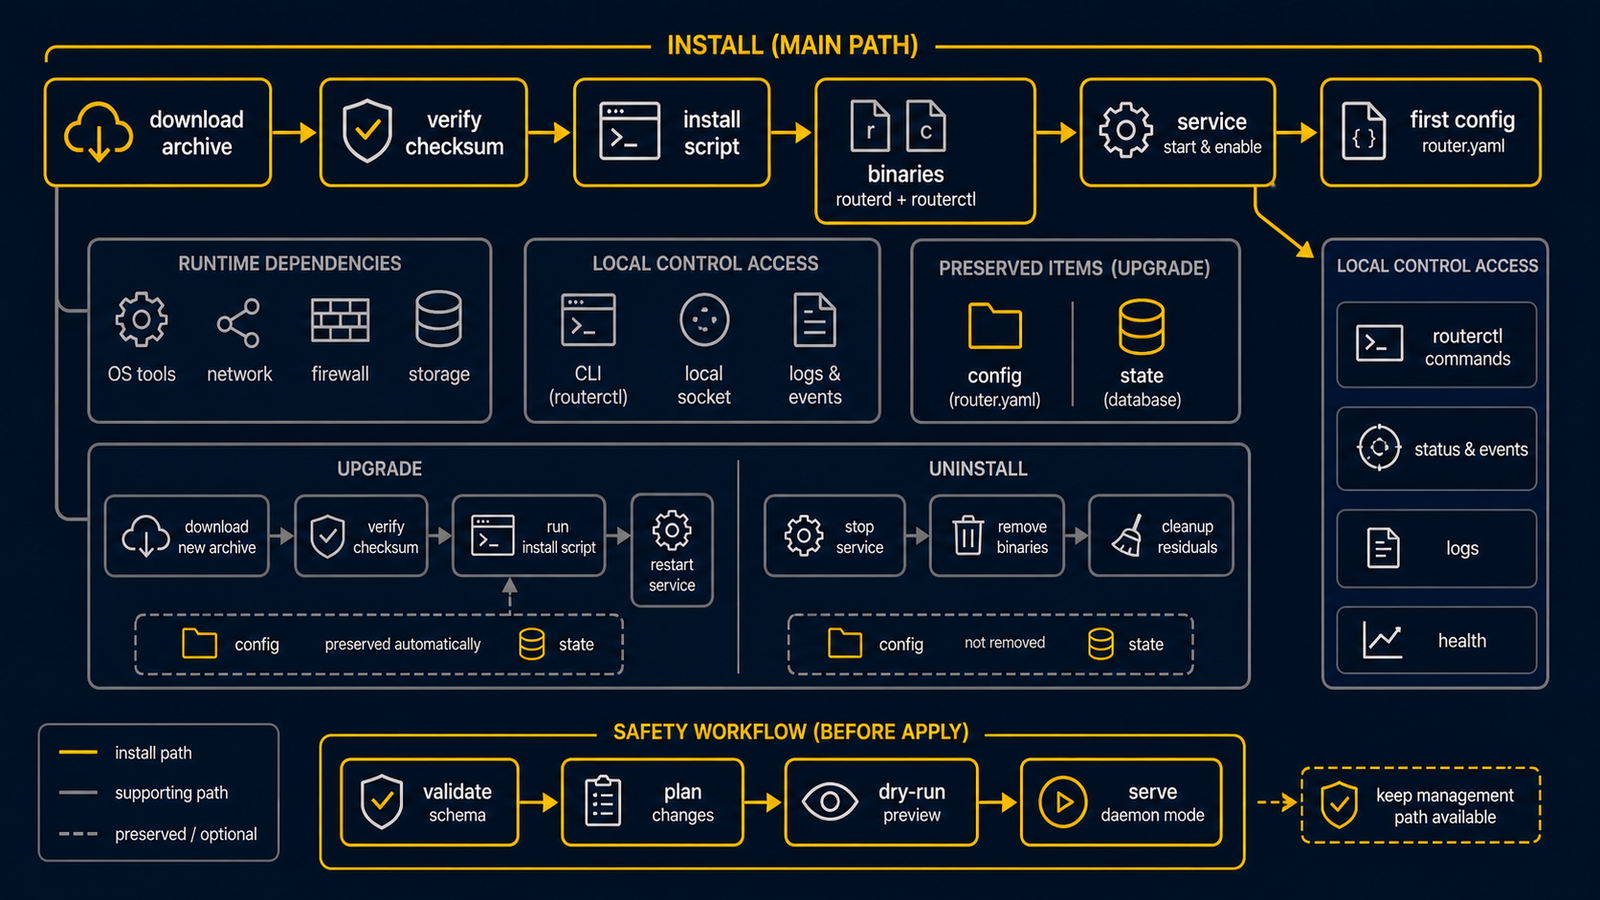
install.sh 会自动判断是全新安装还是升级。
它会将可执行文件放置于 /usr/local/sbin,并安装服务模板。
同时会创建 /usr/local/etc/routerd/router.yaml.sample,
但不会覆盖现有的 /usr/local/etc/routerd/router.yaml。
使用 Live ISO 试用
发布页面也提供以 Ubuntu 为基础的可启动 Live ISO。
curl -LO https://github.com/imksoo/routerd/releases/latest/download/routerd-live.iso
curl -LO https://github.com/imksoo/routerd/releases/latest/download/routerd-live.iso.sha256
sha256sum -c routerd-live.iso.sha256
将 ISO 挂载至 Proxmox VE 的测试 VM 并启动。
控制台会显示 routerd 的初始配置步骤。
以 root 登录后,可启动相同的 install.sh configure 向导。
ISO 适合演示或短时间试用。
若要作为正式路由器使用,请从发布归档包安装至磁盘。
Live ISO 同时启用视频控制台与串口控制台。
在 Proxmox VE 中,请添加串口插槽,并以 qm terminal 连接。
qm create 200 \
  --name routerd-live-demo \
  --memory 1536 \
  --cores 2 \
  --ostype l26 \
  --serial0 socket \
  --vga serial0 \
  --boot order=ide2 \
  --ide2 local:iso/routerd-live.iso,media=cdrom \
  --net0 virtio,bridge=vmbr0 \
  --net1 virtio,bridge=vmbr490
qm start 200
qm terminal 200
测试 DHCP 或 RA 时,请在 net1 使用隔离的 LAN 桥接。
串口控制台配置为 115200 8N1。
向导以纯文本显示,因此无论使用 qm terminal、Framebuffer 控制台或最小化终端,操作体验均相同。
Live ISO 有两种操作模式:
- 临时演示模式: 不选取 USB 存储设备。 配置与日志保存于 RAM,重启后消失。
- 持久路由器模式: 在向导中选取 USB 分区。
向导会将
router.yaml保存至 USB 设备。 下次启动时,ISO 会挂载 USB 设备并还原配置,自动应用。
持久模式下,USB 分区需标记为 ROUTERD。
若有多个可移动设备,可在内核参数中指定 routerd.usb=/dev/sdX1。
辅助工具以 blkid 识别 ext4、vfat、exfat。
默认以 async,noatime 挂载。
仅在明确需要同步写入时,才指定 routerd.usb_mount=sync。
日志暂存于 /run/routerd/logs 的 tmpfs。
向导可启用每日一次的写出作业,
将配置、状态快照及压缩日志归档复制至 USB 设备。
tmpfs 日志上限默认为 100 MiB,
超出上限时,依序删除较旧的日志文件。
安全移除 USB 时,请执行:
/usr/share/routerd/live-persistence.sh flush
/usr/share/routerd/live-persistence.sh umount
有关部署位置与挂载选项, 请参阅 Operations → USB 持久化。
也提供带版本号的 ISO,格式如 routerd-live-vYYYYMMDD.HHmm.iso。
运行时依赖包
默认情况下,install.sh 会安装已知的 OS 软件包。
若只要查看软件包清单,请执行:
./install.sh --list-deps
若以其他机制管理软件包,可禁用自动安装:
sudo ./install.sh --no-install-deps
也可以只安装依赖包:
sudo ./install.sh --deps-only
Tailscale 为可选项目,安装时请加上 --with-tailscale:
sudo ./install.sh --with-tailscale
Debian / Ubuntu
安装程序使用 apt-get 安装以下软件包:
ca-certificates curl dnsmasq-base nftables wireguard-tools chrony bind9-dnsutils tcpdump cron jq ppp pppoe conntrack iproute2 iputils-ping iputils-tracepath net-tools kmod radvd strongswan-swanctl iptables
Fedora 系
安装程序使用 dnf 安装以下软件包:
ca-certificates curl dnsmasq nftables wireguard-tools chrony bind-utils tcpdump cronie jq ppp rp-pppoe conntrack-tools iproute iputils traceroute kmod radvd strongswan iptables
Arch 系
安装程序使用 pacman 安装以下软件包:
ca-certificates curl dnsmasq nftables wireguard-tools chrony bind tcpdump cronie jq ppp rp-pppoe conntrack-tools iproute2 iputils traceroute kmod radvd strongswan iptables
FreeBSD
安装程序使用 pkg 安装以下软件包:
ca_root_nss curl dnsmasq wireguard-tools mpd5 bind-tools tcpdump jq chrony strongswan
FreeBSD 的 pf、ifconfig、route、sysctl、service、sysrc、cron、
netstat、sockstat、ping、traceroute 均为基本系统功能,
不通过软件包安装,仅确认命令是否存在。
升级
解压新版归档包,执行相同的安装程序即可:
tar -xzf routerd-linux-amd64.tar.gz
sudo ./install.sh
若 /usr/local/sbin/routerd 已存在,安装程序会切换为升级模式。
此时会显示旧版与新版的 routerd --version,
替换可执行文件与服务模板,同时保留配置与状态。
若 routerd 服务正在运行,则会重新启动。
在 systemd 主机上,安装程序会等待重启后的 routerd.service 状态插槽就绪,
待 routerd 管理的单元文件更新稳定后,仅重启需要更新的 routerd 辅助服务。
仅在辅助程序运行的是已删除的升级前二进制,或辅助程序启动后单元文件有更新时,才会重启。
若 /etc/systemd/system/routerd.service 已由 routerd 配置管理,
则不以归档包模板覆盖,保留该单元。
被替换的文件会备份为 *.backup.YYYYMMDDHHMMSS。
中途失败时,会从临时备份中还原。
若 routerd 本身将 routerd.service 作为生成的服务产物资源进行管理,
对单元文件的变更会谨慎处理。
应用过程中不会直接重启自身,而是通过 systemd-run 预排一个略有延迟的自我重启。
若同一配置中包含 VRRP 或 ingress 服务资源,
生成的 routerd.service 会自动加入 keepalived 所需的可写路径与 capability。
BGP 通过本地 gRPC Unix 插槽控制长期存活的 routerd-bgp 守护进程,
因此不需要 FRR group 或 FRR 运行时目录。
常用选项:
sudo ./install.sh --no-restart
sudo ./install.sh --dry-run
sudo ./install.sh --verbose
sudo ./install.sh --no-config-update
安装位置
| 项目 | Linux | FreeBSD |
|---|---|---|
| 配置 | /usr/local/etc/routerd/router.yaml | /usr/local/etc/routerd/router.yaml |
| 配置示例 | /usr/local/etc/routerd/router.yaml.sample | /usr/local/etc/routerd/router.yaml.sample |
| 可执行文件 | /usr/local/sbin | /usr/local/sbin |
| 服务模板 | /etc/systemd/system/routerd.service | /usr/local/etc/rc.d/routerd |
| 运行时插槽 | /run/routerd | /var/run/routerd |
| 持久状态 | /var/lib/routerd | /var/db/routerd |
安装程序不会删除以下状态:
/usr/local/etc/routerd/router.yaml/var/lib/routerd/var/db/routerd/run/routerd/var/run/routerd/var/log/otelcol
初始配置
初次试用时,可使用内置的初始配置向导:
sudo ./install.sh configure
向导会依次询问 WAN 接口、LAN 接口、LAN 地址、
LAN 服务、管理路径的放置位置,以及可选的 USB 持久化。
生成的候选配置保存于 /usr/local/etc/routerd/router.yaml.configure,
若已有现有配置,则显示差异。
确认后,安装至 /usr/local/etc/routerd/router.yaml,
接着依次执行 routerctl validate、routerctl plan、routerctl apply。
自动化时,可通过环境变量传递值以跳过提问:
sudo ROUTERD_WAN_INTERFACE=ens18 \
  ROUTERD_LAN_INTERFACE=ens19 \
  ROUTERD_LAN_ADDRESS=192.168.10.1/24 \
  ROUTERD_LAN_CIDR=192.168.10.0/24 \
  ROUTERD_MGMT_MODE=lan \
  ROUTERD_ENABLE_USB_PERSISTENCE=no \
  ./install.sh configure --non-interactive --yes
在 Live ISO 上使用 USB 持久化时,请指定以下值:
sudo ROUTERD_ENABLE_USB_PERSISTENCE=yes \
  ROUTERD_USB_DEVICE=/dev/sdb1 \
  ROUTERD_USB_FLUSH=yes \
  ROUTERD_LOG_TMPFS_LIMIT=100M \
  ./install.sh configure --non-interactive --yes
若只需生成 YAML 文件而不应用,请使用 --no-apply:
sudo ./install.sh configure --no-apply
也可以手动配置。 复制配置示例,编辑接口名称等项目:
sudo install -d -m 0755 /usr/local/etc/routerd
sudo install -m 0600 /usr/local/etc/routerd/router.yaml.sample /usr/local/etc/routerd/router.yaml
sudo vi /usr/local/etc/routerd/router.yaml
验证并确认计划:
routerctl validate -f /usr/local/etc/routerd/router.yaml --replace
routerctl plan -f /usr/local/etc/routerd/router.yaml --replace
确认管理路径安全后再应用:
sudo routerctl apply -f /usr/local/etc/routerd/router.yaml --replace
单次应用正常完成后,启动服务:
sudo systemctl enable --now routerd.service
在 FreeBSD 上请执行:
sudo sysrc routerd_enable=YES
sudo service routerd start
卸载
发布归档包也包含 uninstall.sh。
默认情况下,它会删除可执行文件、服务模板及运行时文件,保留配置与状态。
sudo ./uninstall.sh --yes
若要扩大删除范围,请明确指定:
sudo ./uninstall.sh --yes --purge-config
sudo ./uninstall.sh --yes --purge-state
sudo ./uninstall.sh --yes --all
使用 --dry-run 可仅确认将被删除的内容。
开发者工作流程
Makefile 供开发用途使用, 包含测试、构建、Schema 生成、配置示例验证、网站构建及发布归档包制作。
make test
make check-schema
make validate-example
make website-build
make dist ROUTERD_OS=linux GOARCH=amd64 VERSION="$(git describe --tags --abbrev=0)"
Makefile 不作为用户的安装路径。
标准安装方式为发布归档包搭配 install.sh。